
Student FAQs
Student FAQ's: Updated 10/14/2026
How do I use an Add Authorization code?
If you are currently on a waitlist, you must first drop yourself from the waitlist and then go to Enter CRN from the Register for Classes link.
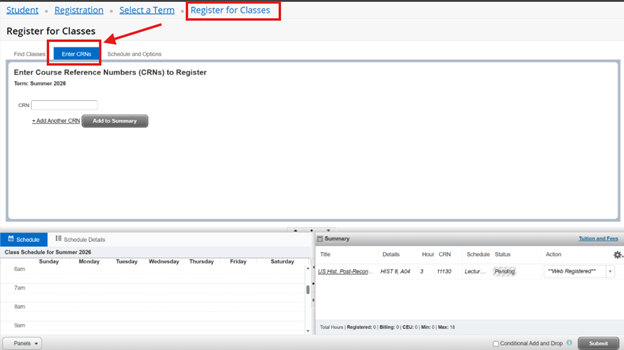
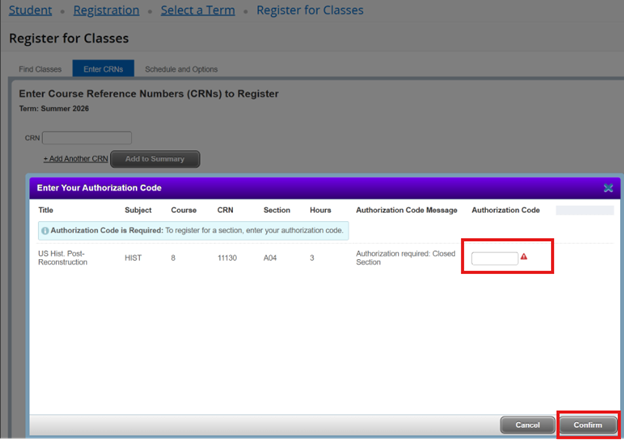
After you enter the CRN for the course select the Add to Summary button. This will give you another screen that you will be prompted
to add the authorization code you were given. Enter the authorization code and select confirm.
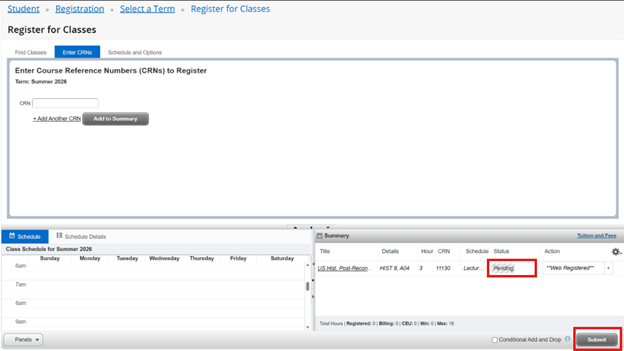
This will now show in the Summary section on the bottom right of the Register for Classes screen as pending. You must now select Submit to be registered into the course.
How do I know when my priority registration date is?
From the Student Dashboard, click on Registration Dashboard under Student Registration.
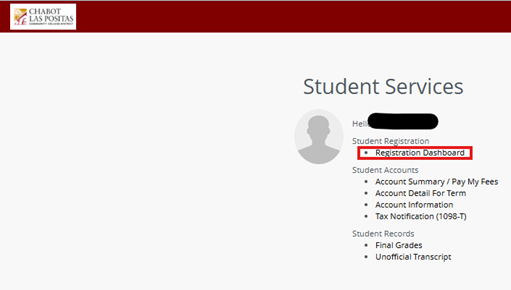
Next select Prepare for Registration. Time ticket information will be in the middle of the page.
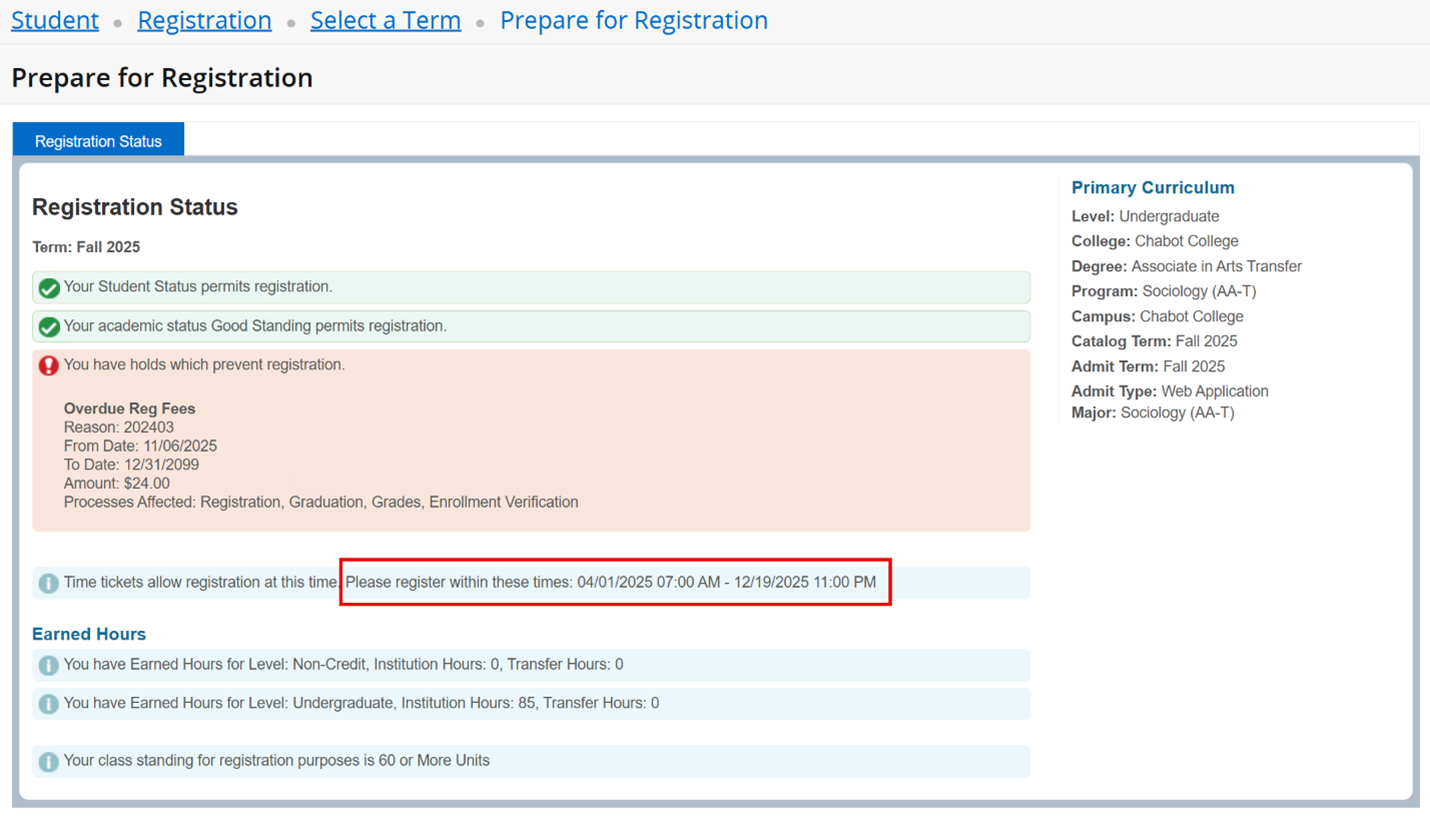
NOTE: Additional information will be available on this screen. If you have a hold that prevents registration, such as overdue registration fees, please clear this amount prior to your registration time so that you can register and enroll in your classes.
How can I pay for my classes?
From your Student Dashboard on MyPortal, click on Account Summary/ Pay My Fees under Student Accounts.
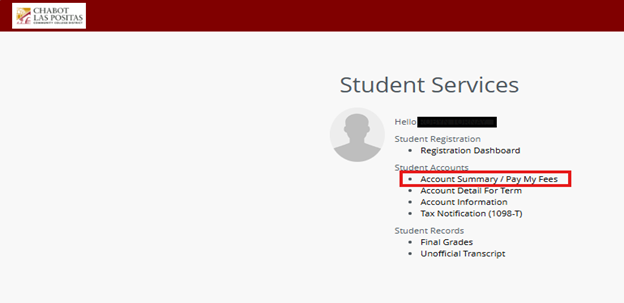
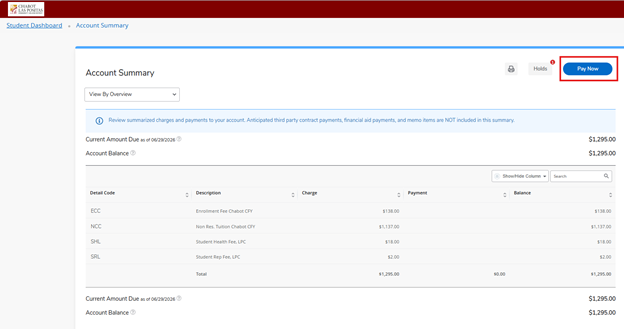
You will see your Account Summary on the next screen. There will be a blue “Pay Now” button on the right side of the screen.
When you select the blue button it will bring a box up on the screen with the following information.
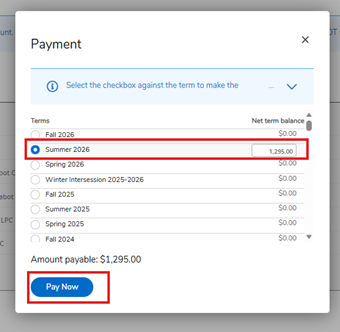
Select the term you are wishing to pay and then select the blue Pay Now button.
Follow the information on the next screens for information regarding your address, payment information, and make sure to select all boxes to secure your payment.
What is Conditional Add and Drop?
This is a feature that allows students to drop a section from their schedule on the condition that he/she can add into another section.
Login to MyPortal
Select Student Dashboard
Select Registration Dashboard
Click on Register for Classes
Choose the term from the drop-down and select continue
Once you have selected sections to register for them will appear in the Summary window on the bottom right side of the screen.
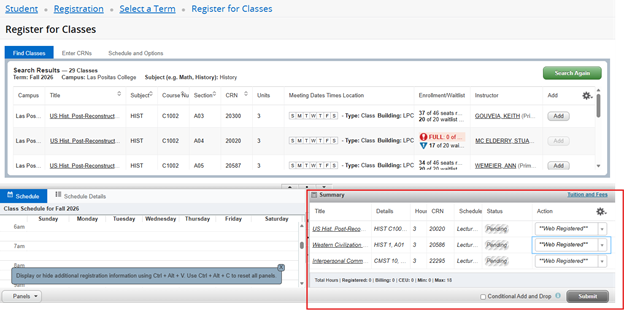
To use the conditional add and drop feature during registration click the checkbox at the bottom of the screen before submitting. This will allow the student to make changes to their schedule while also holding the courses that are not in conflict (i.e. waitlisting, prerequisite issues, repeat issues, etc).
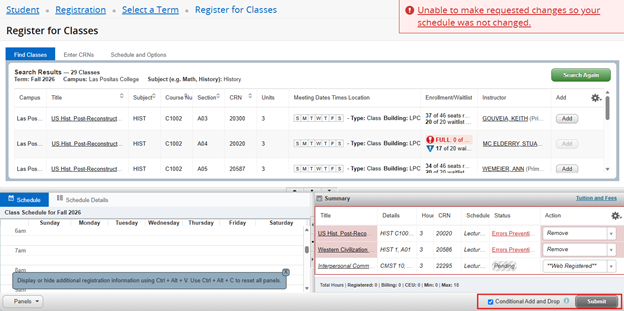
Next select the Search Again green button and then click the grey Search button to find a course that is not in conflict based on the error message that you can hover over. In this example, HIST 1 was closed and only available for waitlisting and HIST C1001 had an open section.
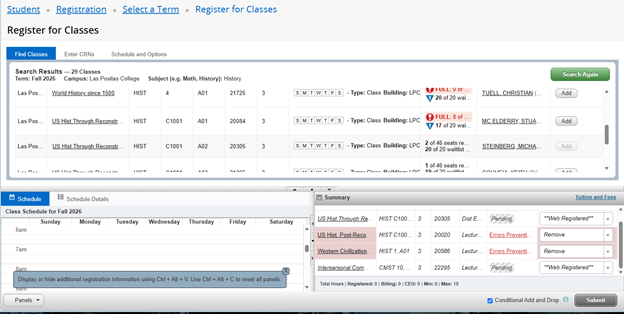
Since the student wanted either of those for their plan, they chose to register into HIST C1001, the open section and added that to their registration.
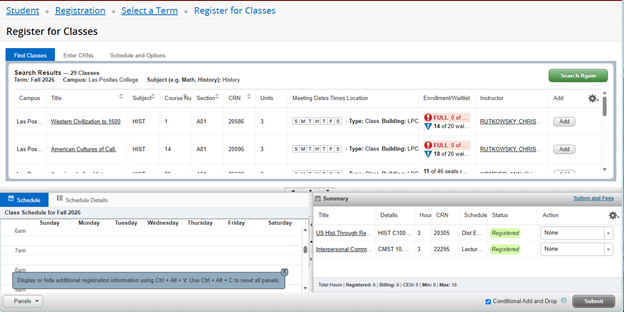
Now the student has two courses registered and can continue to find additional courses by using the Search Again green button.
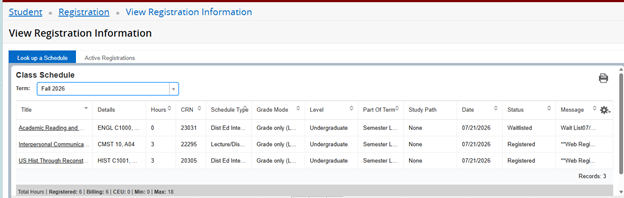
On the Registration Dashboard under View Registration Information a student can then see their schedule and status of registration
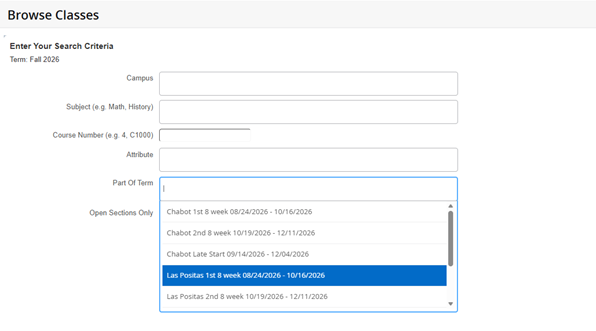
NEW: Where can I see the part of term for classes that are offered?
Part of term for classes can be viewed from the Browse Classes link through the Registration Dashboard. Click on Browse Classes, select the term and select the part of term you are interested in viewing. Then choose the Search button to see your results.
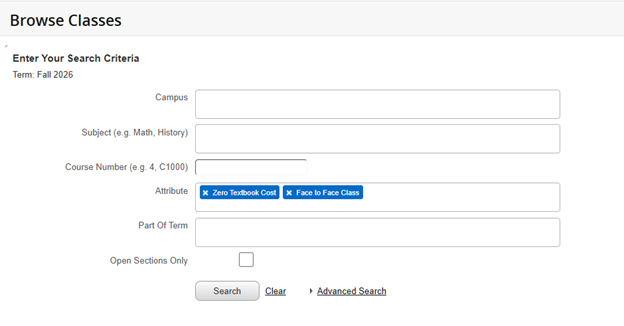
NEW: How do I see a specific attribute that is associated with a class that is offered?
Attributes can be viewed from the Browse Classes link through the Faculty Dashboard. Click on Browse Classes under Faculty Self Service, select the term and click in the attribute field. You can scroll through the list of attributes to find the one you are interested in viewing. If you are interested in more than one, click in the field again and scroll through to select another attribute for it to populate into the field. Then select Search.
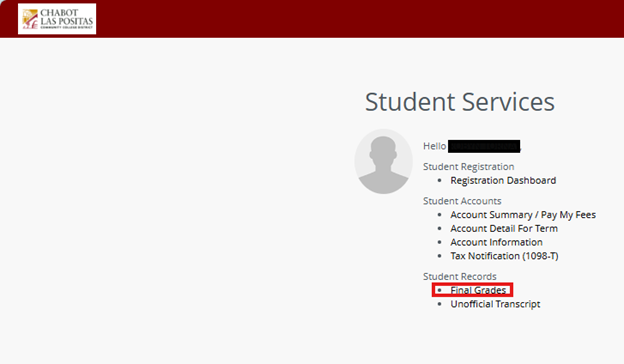
How do I see my final grades?
From the Student Dashboard on MyPortal under Student Records, select Final Grades.
On the next screen, use the dropdown to Select a Term you want to see final grades from.
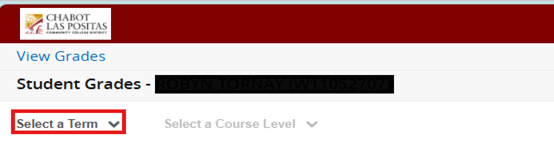
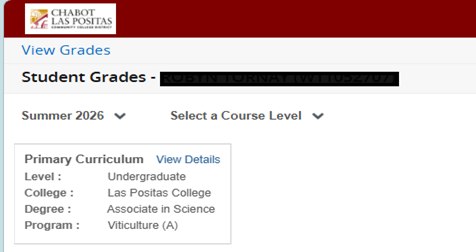
Final Grades will then appear once the grades have been marked visible after the end of the term. (Please consult the Academic Calendar for your college)
How do I view my Unofficial Transcript?
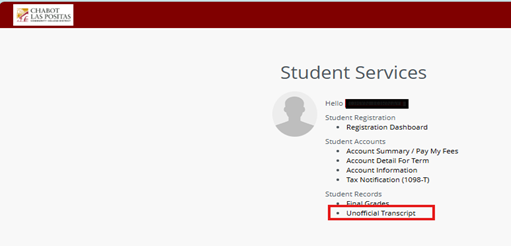
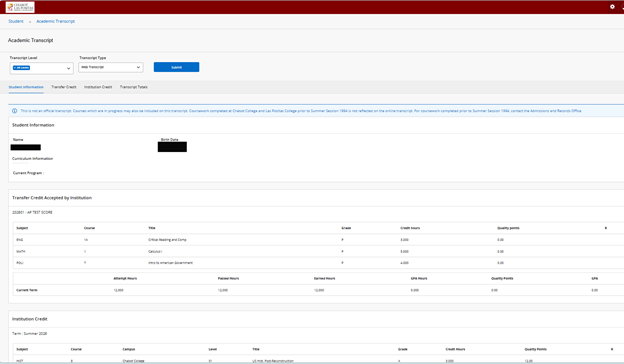
From the Student Dashboard, under Student Records, select Unofficial Transcript.
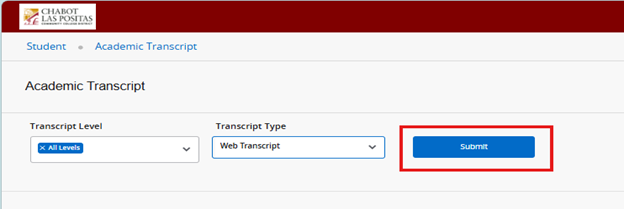
To view all work (transfer, test scores, non-credit, credit) select All Levels from the Transcript Level drop down. Choose Web Transcript for the Transcript type. Then click submit.
You will then be able to print your unofficial transcript with your academic history. If you are in need of an “official” transcript, please go through the proper channels to order an official transcript online.
Where can I find more information about registration?
Additional resources can be found here on the Information Technology webpage, under SSB9 Student Registration Resources
What do I do if I need my password reset?
Click Activate or Reset My Password (you have four (4) attempts before you are locked out for 15 minutes).
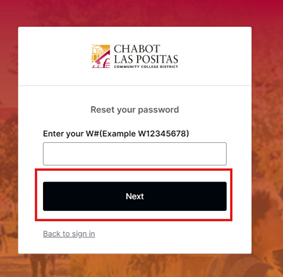
Copy and paste your W# and click next.
You will be directed to a screen where you will be asked to verify your email. Click on the verify your email link. The email will be sent to your Zonemail account only. This is your official college email account. Please check for your password reset activation email.
You can also watch the video on how to reset your MyPortal Password for further instruction.
What email do I use with the college for my classes?
ZoneMail is the official institution email to use with your classes, student services, and any interaction that you have with your colleges. This is issued to you upon entry to your college. Please make sure that you always check this account as new information is always sent here from your instructors, the college, and the district.
For further instructions and information about Zonemail, please visit our Zonemail Resources page.
Video Help Guides
Please contact the Student HelpZone for additional assistance with MyPortal and Zonemail issues. When contacting the HelpZone, please provide your W number and Zonemail address so we can better assist you.
Student HelpZone*
MyPortal and Zonemail support
Email: helpzone@clpccd.org